Using this guide, will help you integrate MontyCloud DAY2™ platform with Azure Active Directory.
When you integrate DAY2™ platform with Azure AD, you can:
Control which users have access to MontyCloud DAY2™ through Azure AD
Enable your users to be automatically signed-in to DAY2™ with their Azure AD accounts
You can manage your accounts in one central location - the Azure portal
To learn more about SaaS app integration with Azure AD, see What is application access and single sign-on with Azure Active Directory.
Prerequisites
To get started, you will need the following items:
An active Azure AD subscription.
If you don't have a subscription, you can create a free Azure account here.
SAML is automatically bundled into your Azure AD subscription as of April 2020.An active MontyCloud DAY2™ account (paid or trial) with the Cloud Admin role.
If you don't have an active account, you can sign-up a free account here.
Before you begin
Configuring Single Sign-On between what is known in SAML terminology as an Identity Provider and a Service Provider requires sharing information to authorize both systems to securely talk to each other. (Your Azure Active Directory is the Identity Provider, and MontyCloud's DAY2 platform is the Service Provider.)
We recommend opening two browser tabs, one for Azure AD, and another for DAY2™, to make this task an easier experience.
We will start the process from the Azure AD portal.
Add the MontyCloud DAY2 app to Azure AD
To configure the integration of DAY2™ into Azure AD, you need to add DAY2™ to your list of managed SaaS apps
Sign into the Microsoft Azure portal
In the left pane, select the Azure Active Directory service.
Go to Enterprise Applications, and then select All Applications.
To add a new application, select new application.
Select Non-gallery application
Enter MontyCloud DAY2™ under Name and then click Add.
Wait a few moments while the app is added to your tenant before proceeding.
Configuring and validating Azure AD single sign-on for DAY2
Once the application has been added, we can now add the configuration to the Azure AD application to create the relationship between Azure AD and DAY2™.
The next steps need to be completed in sequence:
Configure Azure AD SSO - to configure the Single Sign-On settings on the identity provider side
Configure DAY2™ SSO - to configure the single sign-on settings on application side (service provider).
Enable SSO in DAY2™
Assign Users to DAY2™ app
Test SSO - to verify whether the configuration works.
Configure Azure AD SSO
Switch over to the MontyCloud DAY2 interface, but do not close your Azure AD browser window/tab.
Select the Admin Menu, then click on Users & Roles
Click on the Single Sign-On tab
Select the Configure SSO action
Specify a friendly name and description for your SSO configuration, then click Next
Download the DAY2™ SAML metadata file.
This file is needed in the next step to configure your Azure AD MontyCloud DAY2™ application SAML Configuration.
Now that we have the metadata file:
Switch back to your Azure portal, and on the MontyCloud DAY2 application integration page, find the Manage section and select Single sign-on.
On the Select a Single sign-on method page, select SAML.
On the Set up Single Sign-On with SAML page, click the edit/pen icon for Basic SAML Configuration to edit the settings.

4. On the Basic SAML Configuration section, enter in the URLs and Entity IDs as contained within the downloaded metadata file, or copy and paste from the DAY2 interface directly into the matching fields.
Only the Entity ID, Reply URL and Sign-On URL fields are required. Other fields, such as Relay State can be left blank.

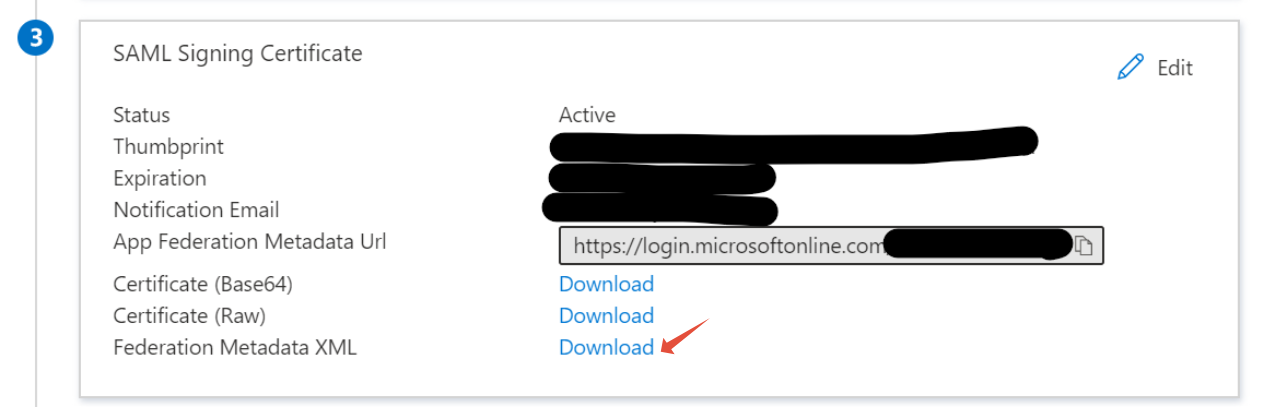
5. On the Set up Single Sign-On with SAML page, in the SAML Signing Certificate section.
Click Download the Federation Metadata XML file and save the file to your local computer.
Keep the downloaded XML file for an upcoming step - we will need this to instruct DAY2 how to talk to Azure AD.
6. We will now configure the SAML claims.
These "Claims" are essential to take key pieces of metadata from Azure AD to be sent to DAY2 during the sign-in process, without DAY2 knowing the internals or configuration of your identity directory structure.
Let's start configuring claims by clicking on Edit under User Attributes & Claims, then we will add each required claim.


a) For the name claim, click on the claim “http://schemas.xmlsoap.org/ws/2005/05/identity/claims/name” and the update Window will open.
From the drop-down for Source attribute, set it to ‘user.displayname’ (to support users without First name /last name)

b) For the email claim, click on the claim, and the update Window will open. From the drop-down for Source attribute field, set the field to ‘user.userprincipalname’

Assign a User to DAY2™ app
Before you can login via Single Sign-On, you need to assign a user to DAY2 app.
1. In the Azure portal, select Enterprise Applications, and then select All applications.
2. In the applications list, select MontyCloud DAY2 app.
3. In the app's overview page, find the Manage section and select Users and groups.

5. Select Add user, then select Users and groups in the Add Assignment dialog

6. On the Users and groups tab, select your user from the user list, and click Select. Then, click Assign.
 7. Now you have users and groups assigned to the relevant Roles for DAY2™ application access

Configure DAY2™ SSO
Now, we will switch back to the DAY2™portal, but please don't close your Azure AD browser tab, we will still need to perform a task there shortly!
You should still have your DAY2 browser window/tab open at Step 2 of the Configure SSO wizard.
Click Next to proceed to the next step.
Upload the Identity Provider (Azure AD) Metadata file by dragging and dropping the metadata file, or click on "click to select files" to open the file browser, locate and select the metadata file.
Click Save & Continue to progress to the next step.
Companion support article
How to retrieve your Azure AD SAML 2.0 metadata

4. To verify that you are the owner of your domain, MontyCloud requires a DNS "TXT" record to be created within your domain's zone records. We can then independently query this record and complete the ownership verification process.
For each domain that you want to enable SSO, add the domain using the Enter your domain text field and Add Domain button, then proceed to add the DNS TXT entry as displayed on the screen.
Use the Verify action once you have finished adding and propagating the TXT record.
Companion support article
Verifying your domain with DAY2

5. Next, if cloud Admin would like to set a default Role and Scope (DAY2™ Projects) for all their new incoming federated users into DAY2™ Platform then can choose to do so otherwise, leave this option as No. Click Save & Continue
6. Review the configuration on the Review page, then click Save to finish the SSO configuration process.
Enable SSO in DAY2™
Once you have completed all the above steps, Single Sign-On Configuration has been completed in both DAY2™ (SP) and the Identity Provider (Azure AD).
When you are ready to accept Single-Sign On users, you can enable the newly created SSO configuration by clicking on the toggle button under Enabled, then click Enable on the pop window

Test SSO
After the preceding configurations are completed, test the SSO configuration by following these steps:
In the Azure portal, go to the MontyCloud DAY2 page, select Single sign-on, and click Test.
Once the test is successful, you should now be able to use Single Sign-On for your Azure AD users to gain access to the DAY2™ platform.
Congratulations!!! You are all set with Single Sign-On access to MontyCloud DAY2™ platform.